Preparing To Play In All Keys

LogoBanner_MartanMannJMCPrep for all keys JP

Preparing to Play in All Keys Introduction

It is universal.  All jazz pianists want to freely play in all keys.  The problem is that each new key appears to us as a "new world".  The look is different and the fingerings are different.  The one constant which is the same in all keys is . . . . the numbers.  Therefore, in order for us to be "free" in all keys, we must think in numbers.  It's a "numbers language".  Once this is accomplished, then the only next step is to analyze each tune by the numbers.  It takes preparation and training.  But . . . it is very doable . . . especially if you learn step-by-step.

It is highly recommended that after completing Preparing to Play in All Keys . . . Continue on to part two of the "Preparing" series . . . . Preparing to Learn a Tune.  You will need to purchase a subscription to have access.  Go HERE to purchase access.

I'd love to hear your questions and feedback regarding this lesson.  Please contact me at martan@jazzskillsforpiano.com.  If you received this lesson as a "stand-alone" lesson . . . check out my online jazz piano course, JazzSkills for Piano (jazzskillsforpiano.com/wp).

Best to you -

--Martan 🙂

Click for AccessPreparing to Learn a Tune

shadow-ornament

Videos

Video 1:  Thinking in Numbers


video
play-sharp-fill

Video 2: White Key Exercise


video
play-sharp-fill

Video 3: Beyond the White Key Exercise

video
play-sharp-fill


Video 4: Learning Progressions

video
play-sharp-fill
shadow-ornament

Step-by-Step


Video 1: Thinking in Numbers

Step #1:  Thinking in Numbers and Intervals.

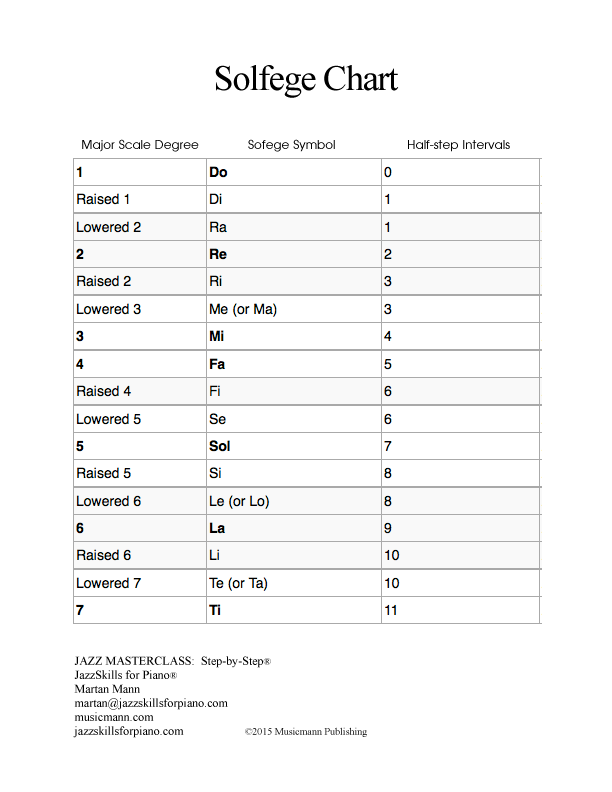
In Europe and parts of Asia, they teach a music system called Solfege.  This is also known as "moveable Do".  That is like singing the first five notes of the major scale as "Do, Re, Mi, Fa, So . . .".

My personal system is to think in numbers.  To do this, look at intervals.  We want to be able to think, hear and play intervals freely and easily.  Take a look at the Interval Chart.  One idea of learning intervals is to to think of a song.  Analyze the first interval(s) of the song.  That will help you to remember the interval.

However you choose to learn your intervals, you have to spend a lot of time doing this.  Keep working on intervals until it is part of your musical language.

Step #2:  Thinking in Chord Structures.

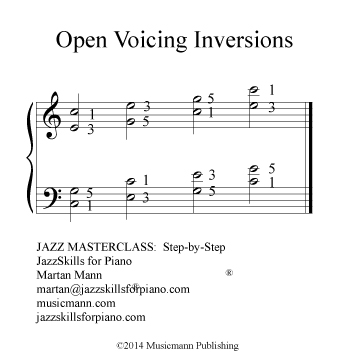
My suggestion is that you think more in chord structures, than chord names.  For instance:  a major triad in the root position is a major third on the bottom (5 half steps) and a minor third on the top (4 half steps).  When we play the major triad in the first inversion, we think of a perfect fourth on the bottom (6 half steps) and a minor third on the top (4 half steps).  Likewise, if we play the major triad in the second inversion, we think of a perfect fourth on the bottom and a major third on the top.

We can do this with all chords.  And once we analyze the structures in intervals, it is relatively easy to play the same intervals in all keys.  The numbers stay the same, even though the notes on the piano are different.

Step #3:  Thinking in Scale Structures.

What gives a major scale a special sound and feeling is the location of the half steps.  In this case, the half steps are between 3 & 4 and 7 & 8.  Think of this as playing from one to one.

If we move our hand up one note to the second degree of the major scale . . . and then play from 2 - 2, this called the dorian mode.  Dorian sounds kind of minor.  This is because the third degree of the scale is now a minor third.

Depending on which note you start in the major scale, the half steps move accordingly.  Make a project to start identifying the different feelings of each mode.


Video 2:  White Key Exercise

Explaining the White Key Exercise

As we look down on the piano keyboard, we can easily see all the white keys.   All of the white keys are actually OK to play.   But, at the same time, it is very difficult to make music out of this.

We need to choose our notes very carefully.  It's choice that we want.  We can't just play random.

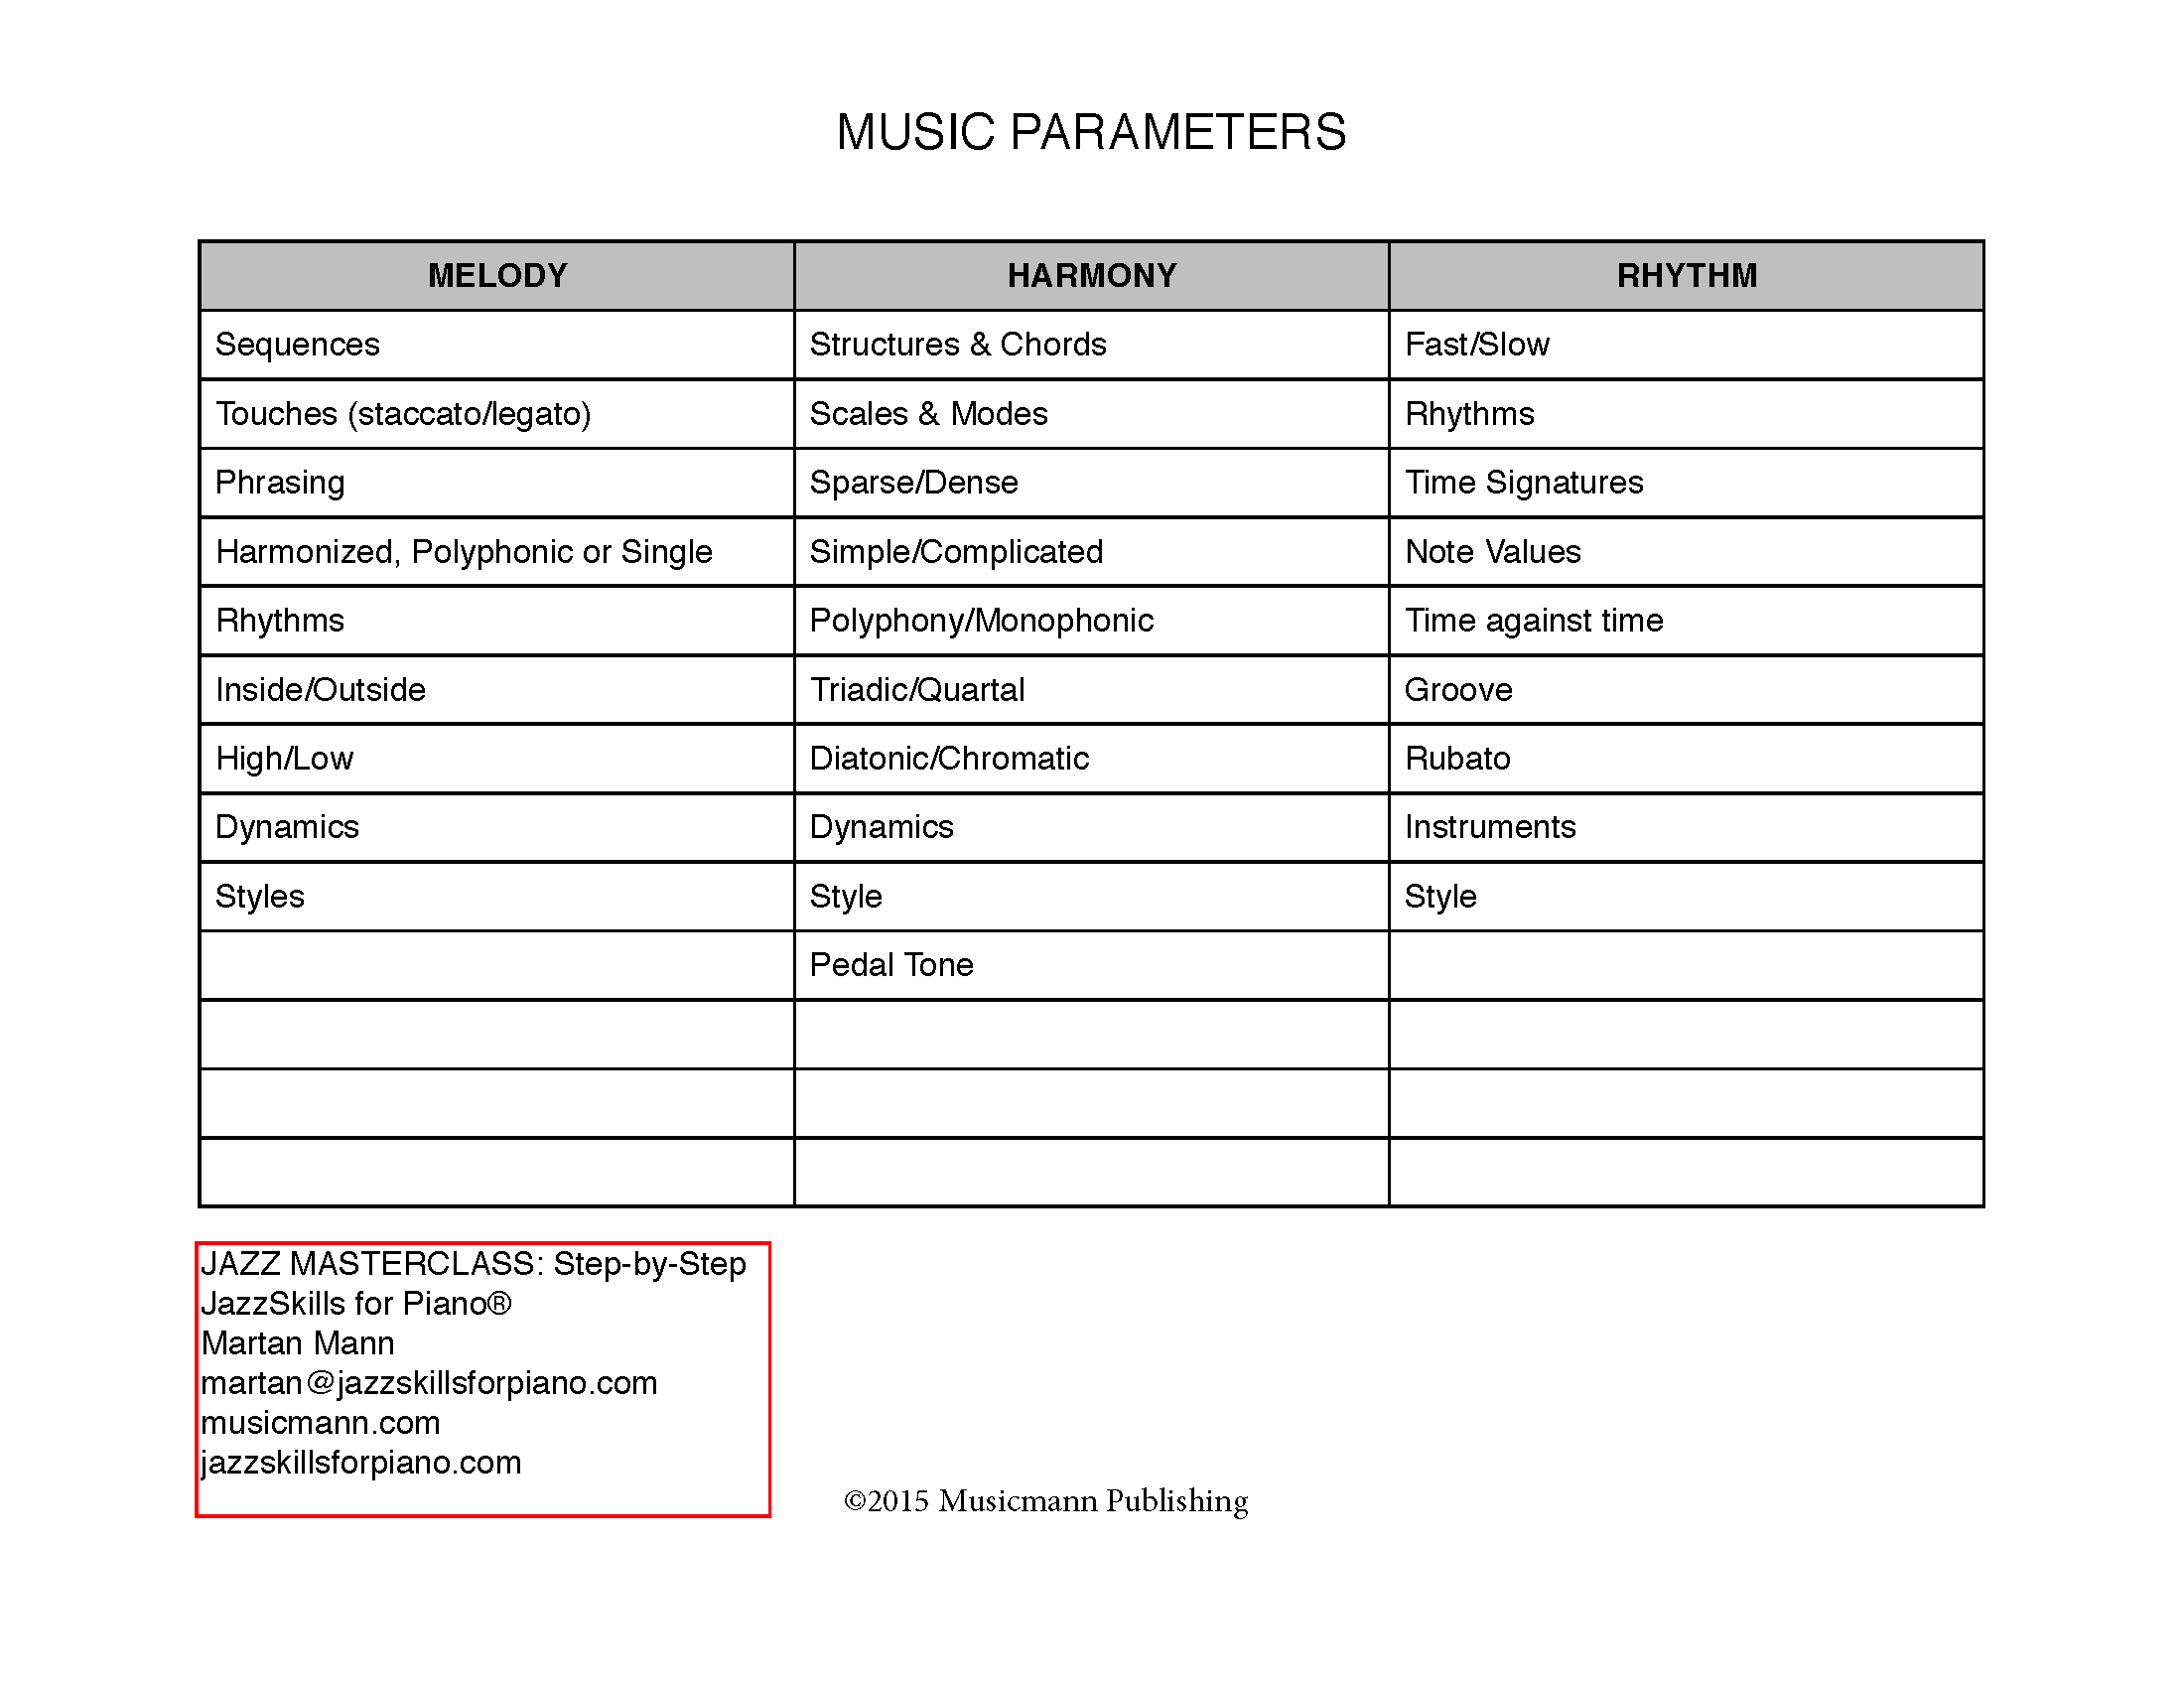
Step #4:  The Music Parameters.

The music parameters are the elements which make up music as a whole.  Prepare a list of music parameters.  I did this under three predominant headings:  Melody, Harmony and Rhythm.   Under each of these headings, we can have many many subsets or parameters.  Make your own study of this.  This adds to your total jazz improvisation.  Jazz improvisation is not just a "stream" of notes.

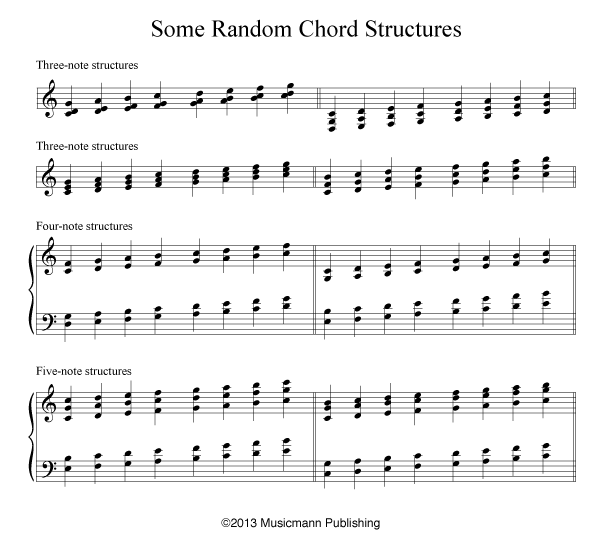
Step #5:  Chord Structures.

An interesting way to begin making sense of the white keys is to use chord structures.  For instance, you can create  a chord structure which uses a major second on the bottom, then the interval of a fourth above that, then another major second above that (the exact intervals will adjust as you play all over the white keys).  Play that structure all over the white keys.  The idea is to get that structure in your head and ears.   Also the main idea is to think down from the top note.  Always treat the structures as a melodic event.

Step #6:  Modes.

A simple explanation of the moes can be seen by observing the white keys.  If you play a scale from C to C, or 1 to 1, (Ionian Mode) the half steps are between 3/4 and 7/8.  In this case, you will have a major third and the total sound will be major.  However if you play from D to D or 2 to 2 (Dorian Mode), the half steps are now between 2/3 and 6/7.  The third is now minor and the total sound of this mode is minor.  Ionian sounds major and Dorian sounds minor.  Take a look at all the modes:

The Modes of the Major Scale

Ionian (Major Scale) 1 - 1
Dorian 2 - 2
Phrygian 3-3
Lydian 4-4
Mixolydian 5-5
Aeolian 6-6
Locrian 7-7

It matters what mode we are playing on the white keys because each mode has its own sound and feeling.  We define what mode is being played by repetition of the bottom bass note.  Experiment with each mode until you get that mode in your ears.

Step #7:  You Play a White Key Improvisation.

Think about what you are playing.   Be very choosy.  There should be a definite pattern to your improv.  There should be a . . . . "there - there".  Give it a try.

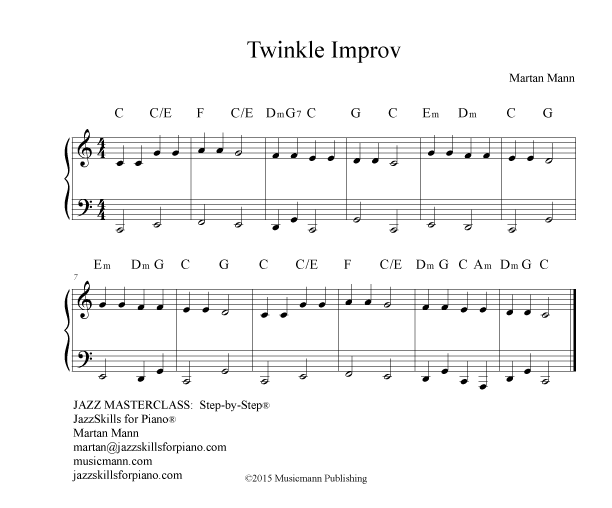
Step #8:  Twinkle Exercise.

Let's take a look at the White Key Exercise from another perspective.  I'm going to use a simple tune, Twinkle, Twinkle Little Star.  This tune is totally White-Key (which is diatonic).

First, play the melody.  Then construct a bas line.  Don't just use the root note of the chord.  Sometimes play a third in the bass, or a fifth.  This creates a contrapuntal bass line.

Now create an improv using chord structures.  So, instead of thinking of chord names, take a look at the territory between the bass note and the melody note.  Then "imagine" the tones you want to play in the middle.  There are many choices of notes that you can play either melodically or harmonically as structures.


Video 3:  Beyond the White Key Exercise

Step #9:  Learning all the Major Scales.

Start now playing all the Major Scales.  Play them with two hands, up-and-down, without thinking.  The scales should be totally effortless.  Make sure you know the sharps and flats in every key.  Know all the notes in every scale.

Step #10: Playing Diatonic Improv in All Keys.

In this step, we are using the skills developed in the White Key Exercise and playing in all keys.  It is suggested that you start with the easiest key for you.  Then, once you master that key, move on to the "next easiest key".

Let's say you are playing in the key of G major.  Take a look at the scale.  Play it up and down.  Notice the F sharps.

Eventually work your way through ALL the keys and scales.

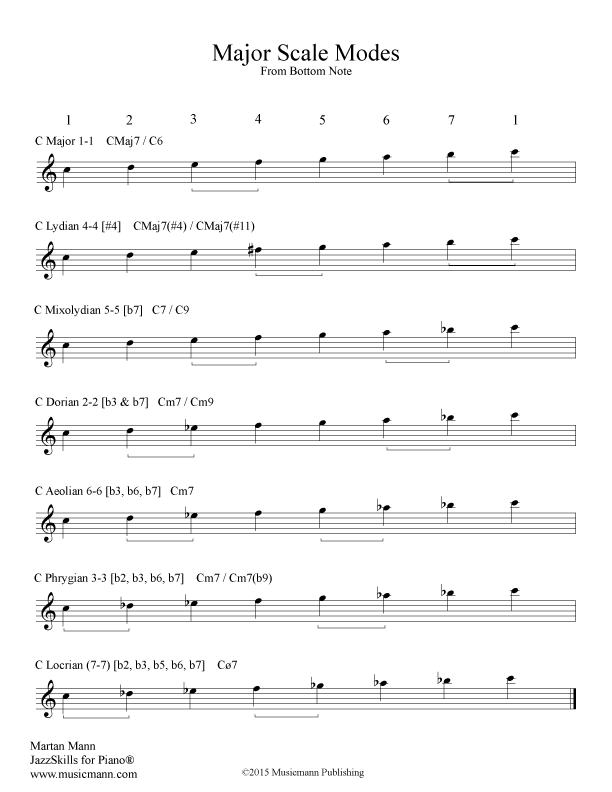
Step #11:  Learning the Major Scale Modes from the Bottom Note.

When we learn the Major Scale Modes from the "jazz perspective", we have to learn the modes from the bottom note.  For instance, when we learn a scale we usually learn and play it from the bottom note.  A C Major Scale usually is played from C to C.

If we learn the Lydian Mode (4-4), we have the option to learn it from the fourth degree of the scale.  That would be from F to F (of the C Major Scale).

But, I'm suggesting that instead you learn the Lydian Mode from the bottom note (in this case it is C).  This means that the mode would in reality be a G Major Scale starting on the bottom note of C.  This would appear to be a C Major Scale with a sharp fourth degree (F#).

Why do we do this?  We do this because we learn modes which "attach" themselves to chords.  In this way we can translate all chords into modes.

Learning the Major Scale Modes from the Bottom Note

Ionian Mode (Major Scale) 1-1
Lydian Mode 4-4 (#4)
Mixolydian Mode 5-5 (b7)
Dorian Mode 2-2 (b3, 7)
Aeolian Mode 6-6 (b3, 6, 7)
Phrygian Mode 3-3 (b2, 3, 6, 7)
Locrian Mode 7-7 (b2, 3, 5, 6, 7)

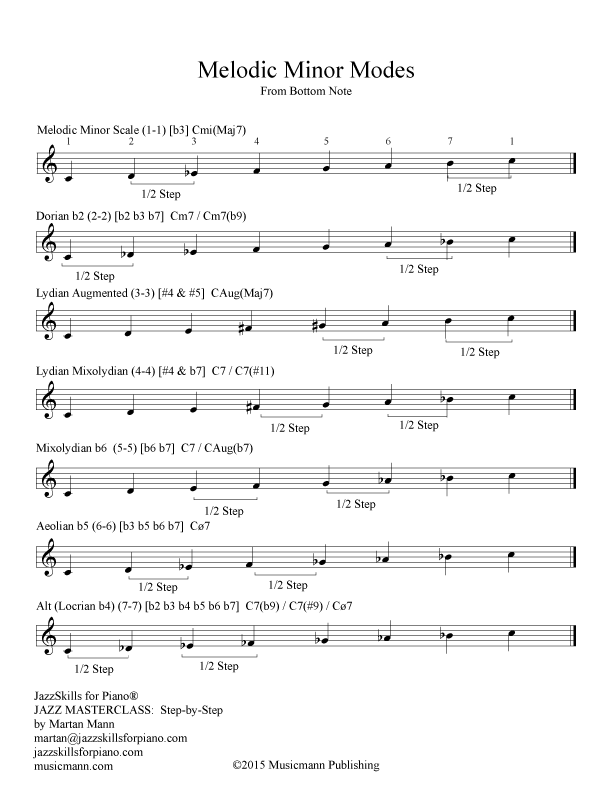
 Step 12:  Learning the Melodic Minor Scale Modes from the Bottom Note.

There are many scales that we can learn the modes from the bottom note.  On of the most popular jazz scales is the Melodic Minor Scale.  Learning the Melodic Minor Scale is easy.  Just play a Major Scale and flat the third degree.  This makes it sound minor.

In classical music theory, the scale goes up with the flatted third and major seventh.  But, it comes down flatting the 7th and 6th degrees.  This gives the scale one sound on the way up and a different sound on the way down (it's the Aeolian Mode).  We don't do this in jazz because we want to identify a specific sound with a specific chord.

For instance, if you are playing a Minor/Major Seventh Chord, the appropriate scale or mode does not exist in the Major Scale.  It does exist, though, in the Melodic Minor Scale (1-1).

Learn all of the modes of the Melodic Minor Scale starting from the bottom note.

Learning the Melodic Minor Scale Modes from the Bottom Note

Melodic Minor Scale (1-1) (b3)
Dorian b2 (2-2) (b2, 3, 7)
Lydian Augmented (3-3) (#4, & 5)
Lydian Mixolydian (4-4) (#4 & b7)
Mixolydian b6 (5-5) (b6, 7)
Aeolian b5 (6-6) (b3, 5, 6, 7)
Alt (Locrian b4) (7-7) (b2, 3, 4, 5, 6, 7)

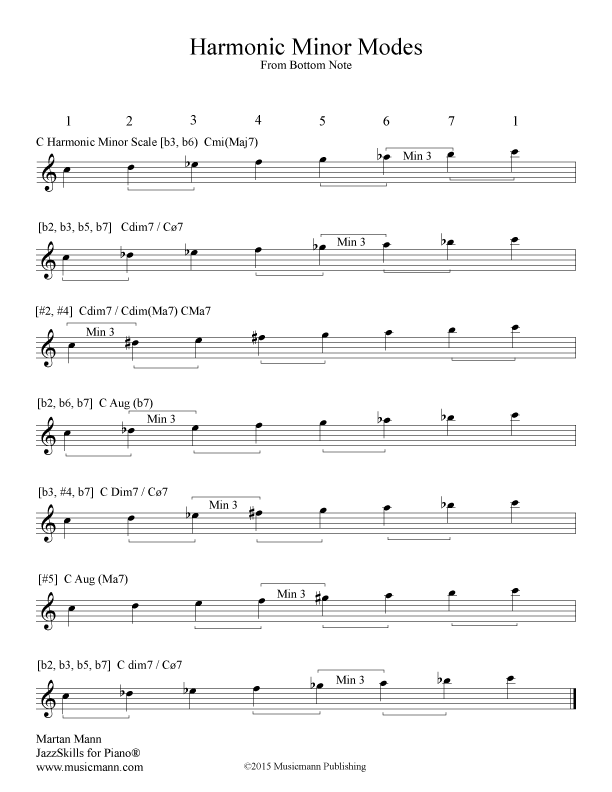
 Step #13:  Learning the Harmonic Minor Scale Modes from the Bottom Note.

The Harmonic Minor Scale has a flat 3 and flat 6.  It works very well with a minor/major 7th.  It is also used when you are playing two-five-one progressions in minor.

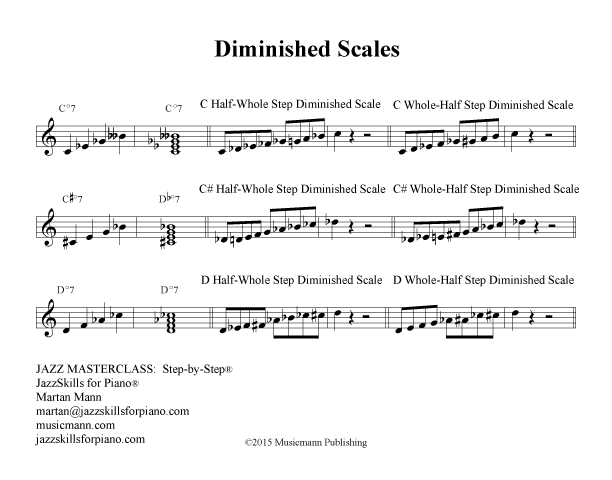
 Step #14:  Learning the Diminished Scale.

The Diminished Seventh Chord is made up of minor thirds.  It is an "equal-distant" chord.  You can create two equal-distant scales from this chord:  the Half/Whole and the Whole/Half Diminished Scale.  This scale works when you are playing any Diminished Chord or a dominant seventh with a flatted 9.

There are only three Diminished Scales:  C, C# and D.


Video 4:  Learning Progressions

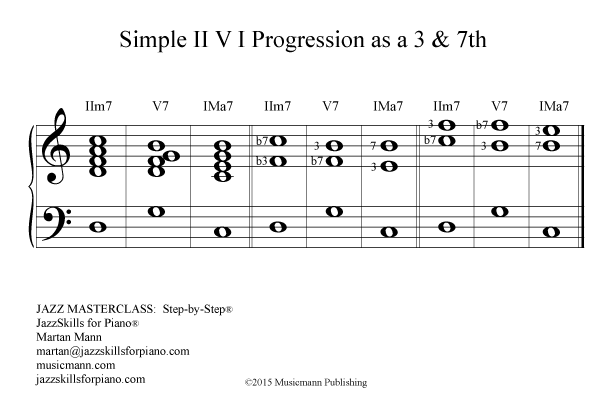
Step #15:  Simple II V I Progression w/ 3 & 7

The Simple II V I uses mostly seventh chords.  There is a IIm7, V7 & IMa7.  The core these progressions is usually the 3 & &.   It should be learned in all keys, around the cycle of fourths and fifths, and up-and-down chromatically.  Learn it in all inversions.  Learn with only the left hand playing the chords.

The Third and Seventh

Minor 7 . . . minor 3rd / flatted 7th
Dominant 7 . . . major 3rd / flatted 7th
Major 7 . . . major 3rd / major 7

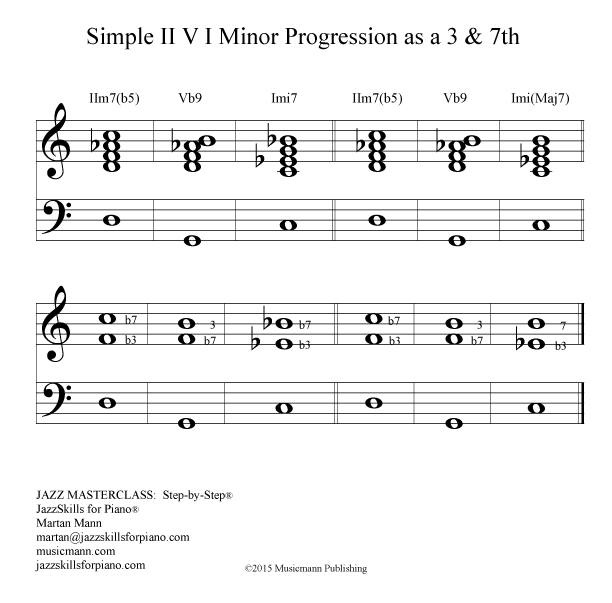
Step #16:  Simple Minor II V I Progression w/ 3 & 7

When using the Simple II V I Minor Progression, you flat the fifth on the minor II chord.  Then, you flat the ninth on the V7 chord.  Finally, you have three choices for the minor I chord:  Im7, Im(Ma7), Im6.  It should be learned in all keys, around the cycle of fourths and fifths, and up-and-down chromatically.  Learn it in all inversions.  Learn with only the left hand playing the chords.

You can also use the 3/7 core with the minor progression.

The Minor Third and Seventh

Minor 7 . . . minor 3rd / flatted 7th
Dominant 7 . . . major 3rd / flatted 7th
Major 7 . . . minor 3rd / minor 7, minor 3rd / major 7th, & minor 3rd / major 6

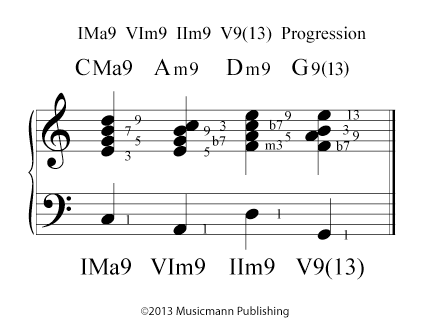
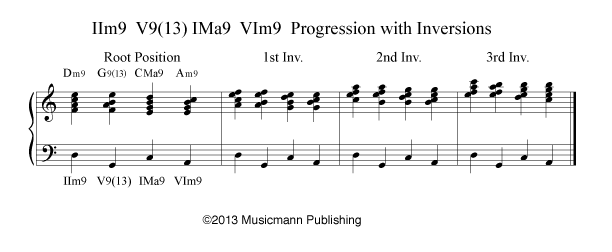
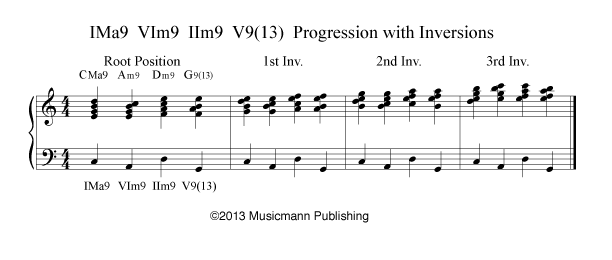
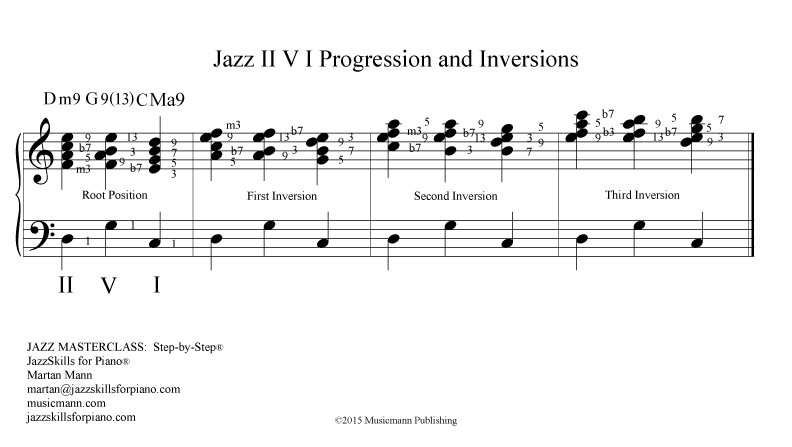
 Step #17:  Jazz II V I Progression and Inversions

The Jazz II V I Progression uses the 9th interval.  This is the standard jazz progression which is learned by all jazz pianists.  It should be learned in all keys, around the cycle of fourths and fifths, and up-and-down chromatically.  Learn it in all inversions.  Learn with only the left hand playing the chords.

It is a IIm9 / V9(13) / IMa9 Progression.

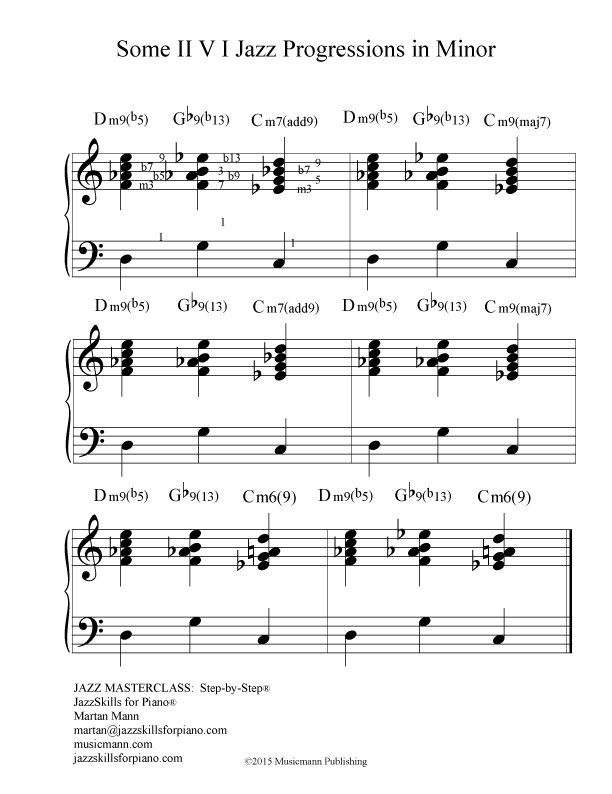
 Step #18:  Jazz Minor II V I Progression and Inversions

The Jazz Minor II V I Progression IIm9(b5), Vb9(b13), and Im9 (or I m9(Ma7).  This is the standard minor jazz progression which is learned by all jazz pianists.  It should be learned in all keys, around the cycle of fourths and fifths, and up-and-down chromatically.  Learn it in all inversions.  Learn with only the left hand playing the chords.

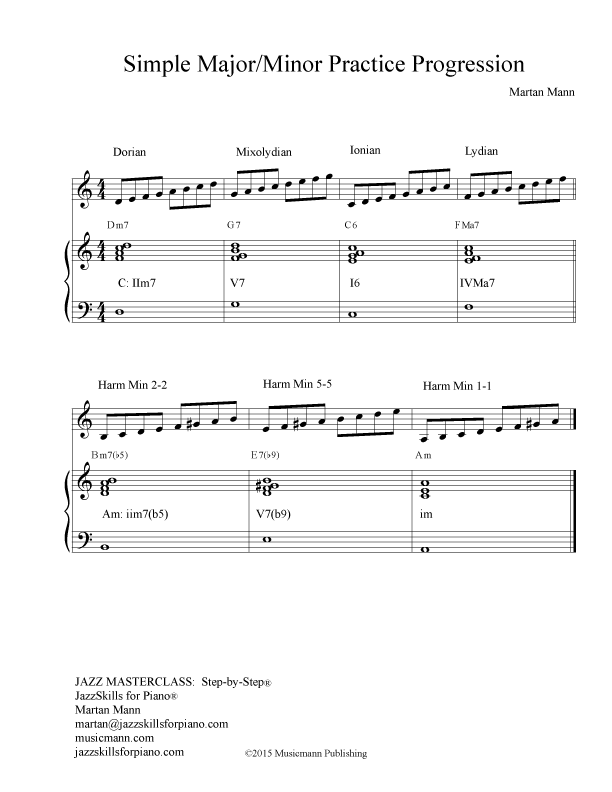
 Step #19:  Simple Major/Minor Progression

This is a progression which uses a II, V, I, IV (in major) and the II, V I (in the relative minor).

The Simple Major/Minor Progression uses mainly seventh chords:  IIm7, V7, C6 (or major seventh), IVMa7.  Then the bass line goes down a flatted fifth (tritone) to the IIm7(b5), Vb9, and Im (in the relative minor).  It should be learned in all keys, around the cycle of fourths and fifths, and up-and-down chromatically.  Learn it in all inversions.  Learn with only the left hand playing the chords.

Each chord has it's appropriate scale.

Scales and Modes for the Simple Major/Minor Progression

IIm7 (Dorian 2-2)
V7 (Mixolydian 5-5)
I6 (Ionian - Major 1-1)
IVMa7 (Lydian 4-4)

In the Relative Minor (bass line down a flatted 5 (tritone)):
IIm7(b5) (Harmonic Minor 2-2)
V7(b9) (Harmonic Minor 5-5)
Im (Harmonic Minor 1-1)

Improvise using the Simple Major/Minor Progression.

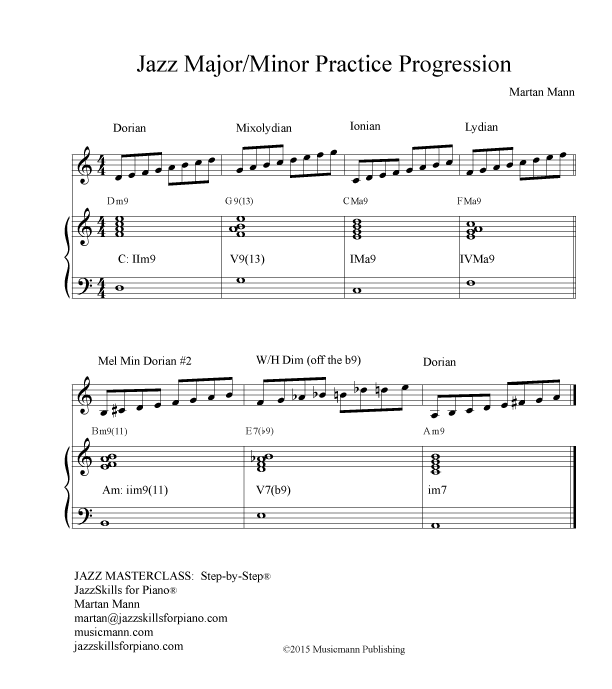
Step #20:  Jazz Major/Minor Progression

This is a progression which uses a II, V, I, IV (in major) and the II, V I (in the relative minor).

The Jazz Major/Minor Progression uses mainly ninth chords:  IIm9, V9(13), CMa9, IVMa9.  Then the bass line goes down a flatted fifth (tritone) to the IIm9(b5), Vb9(b13), and Im9 (in the relative minor).  It should be learned in all keys, around the cycle of fourths and fifths, and up-and-down chromatically.  Learn it in all inversions.  Learn with only the left hand playing the chords.

Each chord has it's appropriate scale.

Scales and Modes for the Jazz Major/Minor Progression

IIm9 (Dorian 2-2)
V9(13) (Mixolydian 5-5)
IMa9 (Ionian - Major 1-1)
IVMa9 (Lydian 4-4)

In the Relative Minor (bass line down a flatted 5 (tritone)):
IIm9(11) (Melodic Minor Dorian #2  (2-2)
V7(b9) (Whole/Half Diminished (off the b9th)
Im (Dorian 2-2)

Improvise using the Jazz Major/Minor Progression.

©2015 Musicmann Publishing

End of Preparing to Play in All Keys.

This is the end of "Preparing to Play in All Keys".  Consider continuing on to the followup lesson:  "Preparing to Learn a Tune".   In this lesson, you will utilize all your new skills by applying them to developing any tune.   Start today!

shadow-ornament


EXAMPLES 

EXAMPLE #1:  Solfege Chart

Solfege-Chart


EXAMPLE #2:  Chromatic Intervals

Intervals-Chrom


EXAMPLE #3:  Triads and Inversions

TriadsSBS


EXAMPLE #4:  Sevenths and Inversions

Sevenths


EXAMPLE #5:  Modes from Each Note and from the Bottom Note

Modes-from-each-noteCR Modes-from-bottom1CR


EXAMPLE #6:  Music Parameters

Music Parameters1


EXAMPLE #7:  Twinkle Improv

Twinkle-Improv1


EXAMPLE #8:  Modes from Bottom Note

Maj-Modes-Bott-Note

Mel-Modes-from-bottom2

Harm-Min-Bott-Note

EXAMPLE #9:  Diminished Scales

Scales-Dim

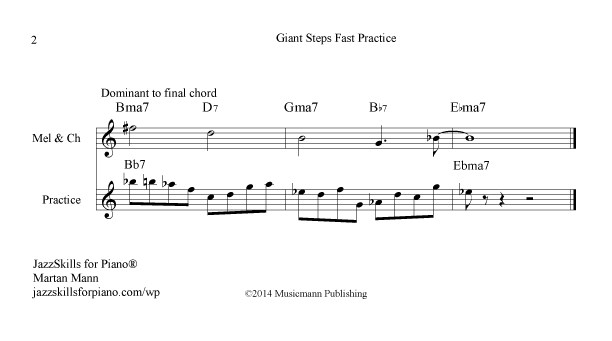
EXAMPLE #10:  Progressions

Prog251-37X Prog251min-37X Prog251min

Prog251inv

EXAMPLE #11:  Major/Minor Practice Progression

MajMinSimPractProg

MajMinJazzPractProg

shadow-ornament

DOWNLOAD FINALE NOTEPAD FILES


DOWNLOADABLE PDFS


Downloads


Learning Boogie Woogie

LogoBanner_MartanMannJMCLearning Boogie Woogie


Learning Boogie Woogie Introduction:


I love playing Boogie Woogie.  It’s a great solo piano style.  It’s not difficult to play and it’s loved by audiences.  Boogie Woogie is a wonderful way to develop the ability to play with groove and to learn the Blues in general.  It is recommended that you study playing this style Step-by-Step.

To mention:  this lesson is part of my online jazz piano course, “JazzSkills for Piano” (www.jazzskillsforpiano.com).  If you are looking for a complete and serious course in jazz piano, this course is for you.  Also, JazzSkills will help you to gain the basic skills to develop Stride Blues skills.

I am happy to answer your questions and hear your suggestions and feedback.  Contact me at martan@jazzskillsforpiano.com.

Best –

Martan 🙂


shadow-ornament

Videos

Video 1:  Learning a Basic Boogie Woogie Accompaniment


video
play-sharp-fill

Video 2: Developing Soloing #1


video
play-sharp-fill

Video 3: Developing Soloing #2


video
play-sharp-fill

Video 4: Miscellaneous Thoughts on Boogie Woogie


video
play-sharp-fill


shadow-ornament


Step-by-Step


Step #1:  Explanation of the 12-Bar Blues.

The Basic 12-bar Blues is in three groups or sections of four-bars.

I Section:     I   I   I   I

IV Section:  IV  IV  I  I

V Section:   IV  V  I  V

Step #2:  Boogie Woogie Accompaniment.

This is a basic Boogie Woogie Accompaniment.  Learn this accompaniment thorougly so that you can play it freely and easily.

Step #3:  Boogie Woogie Groove.

Work hard to develop a good groove playing the Boogie Woogie.  Remember:  a good groove pushes the beat of the metronome.

Step #4:  Boogie Woogie with the Left Hand.

Now we are dropping the Right Hand and playing the BW in the Left Hand.

Step #5:  Boogie Woogie Rhythmic Patterns.

A good idea before soloing . . . is to play rhythmic patterns.

Step #6:  Boogie Woogie w/Mixolydian Mode.

Here we are using the Mixolydian Mode to create melodies.

Step #7:  Boogie Woogie w/Mixolydian Mode with Chords.

We are playing the Mixolydian Mode with chords.

Step #8:  Boogie Woogie Creating Melodies.

Here are three sample BW licks.  Notice that they are all based on “pick ups” . . . which move forward to the next chord.

Step #9:  Boogie Woogie Scales.

I offer two choices of scales:  the Blues Scale and the Mixolydian Plus Scale (Mixolydian Mode plus a flatted 3 and 5).

Step #10:  Continuous Melody Exercise.

This is a great way to learn how to solo (in all styles).  Play continuously in Quarter Notes, Quarter-Note Triplets, Eighth Notes and Eighth-Note Triplets.

Step #11: Rhythmic Melody Exercise.

After you master the Continuous Melody Exercise, practice playing specific melodic rhythms through the 12-Bar Blues form.

Step #12:  Boogie Woogie Ostinato Patterns.

Any Ostinato is a repeating pattern, usually in the bass.  Study lots of Boogie Woogie Ostinato Patterns.

Step #13:  Boogie Woogie Eight-Bar Blues.

The BW 8-Bar Blues leaves out the IV Section of the 12-Bar Blues Form.

I   I   I   I  V   IV   I   V

Step #14:  Boogie Woogie Endings.

Here are some sample BW endings and licks.


©2014 Musicmann Publishing


shadow-ornament


EXAMPLES 

EXAMPLE #1:  Basic 12-Bar Blues Form

Blues 12bar


EXAMPLE #2:  Boogie Woogie Blues - Accompaniment #1

BW-Blues-Accomp1a


EXAMPLE #3:  Boogie Woogie Blues w/Rhythmic Patterns #1


BW-RhyPat1

EXAMPLE #4:   Boogie Woogie w/Rhythmic Patterns #2BW-RhyPat2


EXAMPLE #5:  Boogie Woogie Mixolydian Mode


BW-MixoChords

EXAMPLE #6:  Boogie Woogie Licks. BWLicks1BWLicks2BWLicks3


EXAMPLE #7:  Blues Scale Blues-Scale-single


EXAMPLE #8:  BW Continuous Melody Exercise


BWContMelA BWContMelB

EXAMPLE #9:  BW w/Rhythmic Patterns


BW-RhyPat1 BW-RhyPat2 BW-RhyPat4

EXAMPLE #10:  Sample Boogie Woogie Ostinatos


BWLHostinatos

EXAMPLE #11:  BW 8-Bar Blues


BWBlues8bar


EXAMPLE #12:  BW Sample Endings


BWEndings

shadow-ornament

DOWNLOADABLE PDFS


Downloads


Pachelbel Canon Improv

LogoBanner_MartanMannJMC

Pachelbel Canon Improv


Pachelbel Canon Improv Introduction:


Pachelbel Canon is a very popular classical piece.  Because it uses a very specific bass line, it is a perfect introduction to improvisation on piano.  In this lesson we learn the basic bass pattern of Pachelbel.  Then we explore Open Voicings (Four-Part Harmony).  Then, we add in melody.  Finally we create a latin groove.  It’s all fun . . . and very doable.  However . . . you do need a basic knowledge of music theory and be a functioning pianist to fully enjoy this lesson.

I’d love to hear your questions and feedback regarding this lesson.  Please contact me at martan@jazzskillsforpiano.com.  If you received this lesson as a “stand-alone” lesson . . . check out my online jazz piano course, JazzSkills for Piano (jazzskillsforpiano.com/wp).

Best to you –

–Martan 🙂

shadow-ornament

Videos

Video 1:  Introduction to the Pachelbel Canon

video
play-sharp-fill

Video 2: Learning Open Voicings

video
play-sharp-fill

Video 3: Pachelbel with Groove

video
play-sharp-fill

Video 4: Pachelbel and the Modes

video
play-sharp-fill


shadow-ornament

Step-by-Step


Step #1:  Pachelbel Bass Line.

The Bass Line of the Pachelbel Canon:

I   V   VIm   IIIm   IV   I   IV   V

Step #2:  Pachelbel Bass Line w/Melody.

This is adding the melody of the Pachelbel Canon to the Bass Line above.  The melody starts on the third and moves down the major scale.

Step #3:  Pachelbel Bass Line with Continuous Melody.

Practice the Continuous Melody Exercise in Quarter Notes, Quarter-Note Triplets, Eighth Notes and Eighth-Note Triplets.

Step #4:  Bass Line w/Random Continuous Melody.

Now we combine the above exercise into random rhythmic notes.

Step #5:  Introduction to Open Voicings.

Here is a beginning introduction to Open Voicings . . . also know as Four-Part Harmony.

Step #6:  Open Voicing Bouncing Exercise.

Study how to randomly bounce through the Open Voicings (without doubling the third).

Step #7:  Open Voicings with Melody.

Here we learn how to combine the Open Voicings with Melody.

Step #8:  Open Voicings with Melody in all Voices.

Now we progress . . . placing melodic ideas in the Soprano, Alto, Tenor and Bass parts.  You can play in thirds, sixths and tenths.

Step #9:  Set a Groove.

Here is where we have the most fun.  First learn how to clap or sing a groove.  Then apply the groove to the Pachelbel Canon.  I suggest that you start very slowly.

Step #10: Bouncing OV w/Groove.

Practice the OV Bouncing Exercise with Groove.

Step #11:  Playing OV w/Groove.

Play through the Pachelbel Canon with Band-in-a-box or metronome.

Step #12:  Break up Open Voicings

Practice breaking up the chords.

Step #13:  Add in Melody.

Add in melody.

Step #14:  Discussion on Modes.

Modes come from scales.
A scale is a specific arrangement of steps.
Modes are starting the scales on different degrees of the scale.

Step #15:  Pachelbel and the Modes.

Modes come from scales.
A scale is a specific arrangement of steps.
Modes are starting the scales on different degrees of the scale.
Play bass note and melody notes in Pachelbel.
In the key of C, all the notes are diatonic and are on the white keys.
Play each melody and bass note through Pachelbel.  Carefully choose the notes in the middle.  These can be played as structures or melodies.
Play in all keys.

Step #16:  Pachelbel as a jazz waltz.

Use Band-in-a-box.
Think structurally.
Comp behind a solo instrument.
Play in all keys.


©2014 Musicmann Publishing

shadow-ornament


EXAMPLES 

EXAMPLE #1:  Pachelbel Canon Bass LinePachbassline


EXAMPLE #2:  Pachelbel Canon Bass & Melody


Pachbassmel


EXAMPLE #3:  Pachelbel Canon w/Melodies w/One Note in BassPachMel1a


EXAMPLE #4: 

Pachelbel Canon w/Melodies w/One Note in Bass Page 2

PachMel1b


EXAMPLE #5:  Pachelbel Canon Continuous Melody w/One Note in Bass

PachMel-ContMelA PachMel-ContMelB


EXAMPLE #6:  Pachelbel Canon Melodies with Open Voicings

PachOVwMelPachMel-ContMelB


EXAMPLE #7:  Pachelbel Canon Melodies with Open Voicings Thirds, Sixths & Tenths

PachOVwMelCont


EXAMPLE #8:  Pachelbel Canon Bouncing Exercise

PachRandomBouncing2Pach-bass&mel-modes


shadow-ornament

DOWNLOADABLE PDFS


Downloads


Stride Blues for the Jazz Pianist

LogoBanner_MartanMannJMCLearning SB for the JP


Stride Blues for the Jazz Pianist Introduction:


Stride Blues is an older piano blues style.  It is a wonderful way to play solo piano.  It’s not hard to learn . . . but you have to learn it step-by-step.  Learn each step thoroughly before moving on to the next step.

I’d love to hear your questions and feedback regarding this lesson.  Please contact me at martan@jazzskillsforpiano.com.  If you received this lesson as a “stand-alone” lesson . . . check out my online jazz piano course, JazzSkills for Piano (jazzskillsforpiano.com/wp).

Best to you –

–Martan 🙂

shadow-ornament

Videos

Video 1:  Explanation of the Blues Form

video
play-sharp-fill

Video 2: Developing the Stride Blues Style

video
play-sharp-fill

Video 3:  Open Voicings for Stride Blues

video
play-sharp-fill

Video 4:  Putting it all together

video
play-sharp-fill


shadow-ornament

Stride Blues Step-by-Step

Step #1:  Explanation of the basic blues form.


The Basic 12-bar Blues Form consists of three groups of four measures.  Familiarize yourself with this form in all keys.

The Basic 12-bar Blues Form:

Section I:  I   I   I   I

Section IV:  IV   IV   I   I

Section V:  IV   V   I   V


Step #2:  The Stride Blues 12-bar Blues Form.


Below is one of many variations of the Basic 12-Bar Blues.  This is a good example of a 12-Bar Blues form used for Stride Blues.  It is a great idea to learn this form thoroughly.  First learn it in C.  Then play it in all keys.

Stride 12-Bar Blues Form

(key of C - all chords are dominants)

Section I:      ||:C7  C7/E | F7  F#dim7 | C7  G7 | C7       |

Section IV:   | F7  F7/C | F#dim7        | C7  B7 | Bb7  A7 |

Section V:     | D7      |G7  G7/B | C7  A7 | D7  G7 :||


Step #3:  Learn the Bass Note w/Lead-ins.

Develop the bass line . . . almost like you are a bass player.  Bass players play "lead-ins".  This leads them from chord to the next chord.

There are a number of ways to play lead-ins:

1) You can repeat and jump to the next chord.

2)  You can move chromatically.

3)  You can move diatonically (within the key).

Play bass lines over and over until they are comfortable.

Step #4:  Developing the Chord Inversions

In this step, you play chords and their inversions in the right hand.  Remember, the blues uses mostly dominant 7th chords.  This means you have four notes and consequently, four inversions.  Play through the entire Stride Blues form playing all the chords in all inversions.  Do this until you are completely comfortable.


 Step #5:  Combine LH Bass & RH Chord Inversions.

Normally the stride blues is performed primarily in the left hand.  But, for the purpose of initial practice, we will play the bass note (with lead-ins) in the left hand and the chord (with inversions) in the right hand.


Step #6:  Developing the Stride Groove.

The best way that I know to develop a groove . . . is to sing it first.  Then play through the stride blues form over and over until the groove is natural and easy.


Step #7:  Playing all with the left hand.

Play the bass note and the chord in only the left hand.  This is very difficult.  I suggest that you practice this slowly.  Then, pick up tempo as your skill increases.


Step #8:  Playing fast stride.

Practice playing the left hand stride fast.  To play faster, you must simplify lead-ins and chord inversions.  Take a long time to work on this step.


Step #9:  Open Voicings Inversion Exercise

Open voicings are a valuable tool to use in the Stride Blues style.  It creates good voice leading.

To create an open voicing, take a closed position triad.  Remove the third and place it an octave above.   Then add another tone above that.  That should create a four-part soprano, alto, tenor, bass voice leading.

For Step #9:  Play the Open Voicings in inversions.  Do this in all keys.


Step #10:  Open Voicings Series Exercise

Practice the Open Voicing Series Exercise.  Notice that it is organized by the left hand.  Learn this series of voicings in all keys.

Step #11:  Open Voicings Bouncing Chords

Establish two of the voicings in the right hand.  Notice that the top voicing is the melody.  Once we have done that, we can play two voicings in the left hand.  If the right hand has a third in it, then do not play a third in the left hand.  This prevents playing a double-third.

Practicing freely "bouncing"  through all the voicings in one-chord, noticing the top melody note.  You can do this for all triads and all keys.  Eventually play this quickly and fluently.


Step #12Make Up Your Own Progression

To start with "Make up your own progressions", take one of the open voicings and ask yourself:  "How many ways can I move to the IV chord with good voice leading?"  Try not to double the third.  Practice playing this in all keys.

Then, take one of the open voicings and ask yourself:  "How many ways can I move to the V chord with good voice leading?"

Then, move to a new open voicing of the I chord and repeat this exercise.

Then, play various voice leadings using variations of the I IV V I.  In this case, this will sound like creating a hymn.


Step #13Add in Seventh Chords

Now, play through the Stride Blues using Open Voicing Dominant Seventh Chords.  Think melodically.  Try not to double the third.


Step #14:  Play with thirds, sixths and tenths

When you are playing Step #13 above, look at your hands for thirds, sixths and tenths.  Then you can create melodic ideas moving in harmony.  Always think musically.


Step #15:  Using 10ths and Sixths in the bass

When you are playing a stride left hand, you can play a single note in the bass.  But, you can also play a tenth.  If you can't reach a tenth, then consider arpeggiating to the tenth (over the fifth).  Or you can play a single bass note to a sixth.  So, when you are playing in the left hand, use single notes, tenths and sixths.

Play through the Stride Blues using only the left hand.


Step #16:  RH & LH with Open Voicings

Now play the left hand stride with single note bass, tenths and sixths with the right hand playing open voicings.  You are doing a little bit of both.  Use your ears and musicality.  Always play forward to the next chord.


Step #17:  Ideas for Soloing

Soloing is all about thinking forward to a destination point.  Start playing with the LH.  When you can think when you have a little space to think about it, add in some melody notes.  In setting up a priority, always think of the left hand first.  Then, add in the melody.  Don't lose the left hand in your mind.  It's about "waiting" for melodic ideas.

Think of the Blues Scale.  Also use the Mixolydian Plus scale.  When making up melodies, think melodically.  Often sing the melodies and play what you are singing.  Think the way a singer sings, or an instrumentalist phrases.  Play "bluesy licks".  You can amass a repetoire of these licks, which you will play over and over.


shadow-ornament


EXAMPLES 

EXAMPLE #1:  Basic 12-Bar Blues Form

Blues 12bar


EXAMPLE #2:  12-Bar Stride Blues Form


12-Bar-Stride-Blues


EXAMPLE #3:  12-Bar Stride blues with Inversions

12-Bar-Stride-Blues-Inv

EXAMPLE #4:  Open Voicing Inversions

OVInv

EXAMPLE #5:  Open Voicings Series Exercise

OV-Series-Exercise

EXAMPLE #6:  Open Voicings Bouncing Exercise

OVexercise


EXAMPLE #7:  Make Up Your Own Progression

OVMUYOP

EXAMPLE #8:  Blues Scale

Blues-Scale-single

EXAMPLE #9:  Blues Scale & Mixolydian Plus Scale

Blues-Mixo+BluesSc

EXAMPLE #10:  Some Sample Blues Endings

BluesEndings


shadow-ornament

DOWNLOADABLE PDFS


Downloads

    Basic 12-Bar Blues
  • 12-Bar Stride Blues Form
  • 12-Bar Stride Blues Inversions
  • Open Voicing Inversions
  • Open Voicing Series Exercise
  • Make Up Your Own Progression
  • Blues Scale
  • Blues Scale and Mixolydian Plus Scale
  • Some Sample Blues Endings


Modal Improv for the Jazz Pianist

LogoBanner_MartanMannJMCModal Improv for the JP200


Modal Improv for the Jazz Pianist Introduction:

Modal playing is a very distinctive style for a jazz pianist.  It “opens up” your playing, using the entire range of the piano.  It increases  your harmonic knowledge.  This step-by-step lesson gives specific analysis, instruction and exercises to develop modal playing into your personal style.  This is a very intensive lesson with eight videos, downloadable PDFs, text, playalong with Band-in-a-box and reference to modal tunes.

I’d also like to mention that I offer Skype lessons.

I’d love to hear your questions and feedback regarding this lesson.  Please contact me at martan@jazzskillsforpiano.com.  If you received this lesson as a “stand-alone” lesson . . . check out my online jazz piano course, JazzSkills for Piano (jazzskillsforpiano.com/wp).

Best to you –

–Martan 🙂

shadow-ornament

Videos

Video 1:  Explanation of the modes

video
play-sharp-fill

Video 2: Modal Parameters

video
play-sharp-fill

Video 3:  Chord Structure Exercise

video
play-sharp-fill

 Video 4:  Diatonic Turnaround Progression

video
play-sharp-fill

Video 5:  Voicings

video
play-sharp-fill

Video 6:  Modal Soloing

video
play-sharp-fill

Video 7:  Modal Exercise - Comping (Playalong Practice)

video
play-sharp-fill

Video 8:  Modal Exercise - Soloing (Playalong Practice)

video
play-sharp-fill
shadow-ornament

Step-by-Step

Step #1:  Explanation of the modes.

To learn the modes, first find a scale.  That scale is defined by having an specific arrangement of half steps and whole steps.  For instance:  the major scale has half steps between 2&3 and 7&8.  A dorian mode (starting on the second degree) has half steps between 2&3 and 6&7.

The Modes of the Major Scale:

  1. Ionian 1-1
  2. Dorian 2-2
  3. Phrygian 3-3
  4. Lydian 4-4
  5. Mixolydian 5-5
  6. Aeolian 6-6
  7. Locrian 7-7


Step #2:  How do you learn the modes?

The best way to think of the modes is to think off of chords.  Every chord suggests a mode.  For instance:  a D minor 7 chord suggests using the dorian mode.  The best way to think and hear the modes is from the bottom note of the mode.  For instance:  think of the D dorian mode as a D major scale with a flatted 3rd and 7th.

Learn the Modes from the bottom note:

  1. Ionian:  1-1 Major Scale
  2. Lydian:  4-4 Sharp 4
  3. Mixolydian:  5-5 Flat 7
  4. Dorian:  2-2 flat the 3 and 7
  5. Aeolian:  6-6 flat the 3, 6 & 7
  6. Phrygian 3-3:  flat the 2,3,6,7
  7. Locrian 7-7:  flat the 2,3,5,6,&7 (also think up a half step to the major scale)

Study each mode in all keys.  Play each mode until it is automatic in your ears and fingers.


Step #3:  What is modal improv?

Modal Improv is playing with, and blending scales.  As a pianist, you "see" the scales in front of you.  When you play modally, you are playing within one chord.  You are thinking of one tonality at a time.  Learning diatonic scales and modes is an important first step.  Diatonic means playing within the major scale.


Step #4
:  Pentatonic Black Key Improv Exercise

In this exercise, you use only the black keys.   That gives you a pentatonic scale (1,2,3,5,6).  The main problem with improvising only on the pentatonics that that there is not a lot of tension.  The tension notes, aka "leading tones" are not there.  You do not have a tritone or a V7 to I.

How do you make sense with your improv when you don't have tension?  You have to study all the other parameters of music.  Parameters are the elements which create music.  You must create drama.  Drama is created by first having a "there there".  You must set up a premise . . . and then manipulate the premise.  First analyze the parameters of music.

Some Parameters of Music

  • Rhythms
  • Meter
  • Rubato
  • Tempo
  • Melodic Sequences
  • Phrasing and Touches
  • High and Low
  • Dynamics
  • Dense or Sparse
  • Modes or Chords
  • Voicings
  • Style
  • Etc.

When you are playing, think:  "how loud am I playing?".  How fast . . . or dense?  What is the meter?  Observe what parameters you are using to create your improv.  You need to create a "happening" for your improv to be successful.  Play on and on and notice the point where you "lose it" . . . where you lose your premise and definition.  It's difficult to recapture a "dramatic event".


Step #5
:  Chord Structure Exercise

The best way to dive into modal playing is to study chord structures.  Play in all scales and all keys.  It's probably best to start with the major scale.  Start with three-notes.  Play different structures.  Analyze them by their intervals.  Don't judge the sounds.  Just play the structures up the scale or make melodies.  Also, use 4-note and 5-note structures.  The structures, scales and keys are all your own choice.  The purpose is to get these sounds into your hands and head.


Step #6
:  Diatonic Turnaround Progression

One of the most important progressions to help your modal improv is the diatonic turnaround progression.  This is a IIm9, V9/13, IMa9, VIm9 or the IMa9, VIm9, IIm9, V9/13.  Learn this progression in all keys and all inversions.  Play with the bass root note and chord in RH and also chord in LH (sing the root).  Play around the Cycle of Keys in 4ths and 5ths.  Also, play up and down chromatically.


Step #7
:  Developing Strong Voicings

1)  Core Voicings:  Sometimes we can be too random in choosing voicings.  This results in voicings that we may not want to use.  Here are a couple of ideas to strengthen your voicings.

First, use "Core Voicings".  You can find some of these core voicings in the Diatonic Turnaround Progression.  Play the closed position voicing and then add in additional diatonic notes from the major scale.  Use your ears to determine the choices that you like.  You can also play the core voicing in the right hand and add in the additional notes in the left hand.  You can also use the additional notes as melodies.

2)  Using 2nds and 4ths:  Play fourths in the left hand and add in 2nds in the right hand.  You can also do the reverse:  play the fourths in the right hand and add the seconds in the left hand.  Do this by ear.

3)  "So What Voicing":  Another idea for strengthening your voicings is to use the "So What Chord".  This is a prominent chord used throughout jazz.  The intervals from the top down are 3, 4, 4, 4.  This chord is ambiguous and can be used as a major 9 (add a root a major 3rd below), Minor 11 (the root is the bottom note of the "So What Chord", and Sus chord (add a root a major 6th below).  Play this chord all over the piano.  Think melodically.


Step #8:  Modal Soloing

One of the problems with creating a modal solo . . . is that you usually stay on one chord or mode for a long time.  For instance, if you are playing on a D minor 7, you will possibly be playing on a D Dorian Mode.  Any of the notes of that mode are OK.   However, this creates a problem.  It's very easy to create a boring solo, where you are just "filling up space".

The left hand usually comps playing fourths.  You might want to avoid the fourths which have a tri-tone.  They are not as "smooth" as the perfect-fourth fourths.

Ideas for Modal Soloing

1)  Use all the music parameters.  Think about the parameters as you are soloing.  Work on your phrasing.

2)  Licks and musical phrases all should land on a specific destination point.

3)  Sing as you play.  Develop your own language and dialect to help your musical phrasing and style.

4)  Think from V7 to I.  You can do this diatonically.  You can also use an V alt (#9, b13) to I.

5)  Set up a pedal tone in the left hand bass.  Then play different chords over the pedal tone in the right hand.  I often use a pedal tone using the V - but, you can also use a I pedal tone.  Make sure that you resolve this to the I chord.

6)  Always create melodies for dramatic effect.  Create interest.


Step #9
:  Modal Exercise #1 - Comping (Playalong Practice)

Use Modal Exercise #1.  This is a simple exercise where you choose one mode . . . and then, play that mode in different keys.  You can choose how many measures to play on each mode.

In my example:  I have chosen the dorian mode in four different keys (Dm, Fm, Abm, Cbm).  Each key is 8 measures.  The entire play along solo is 3 choruses.

I am using Band-in-a-box using a sax lead.  I am comping behind the sax player.  Use chord structures.  Think of the top note of the structure as a "melody" note.  If you don't have band-in-a-box, you can "imagine" a solo and just comp using a metronome.  Or perhaps you have a friend who can play a solo.

In the second example:  It is your turn.  You can play using the play along audio.  Have fun.


Step #10:  Modal Exercise #2 - Soloing (Playalong Practice)

Use the Modal Exercise #2:  the Mixed Modal Exercise.  In this exercise, you choose what mode, key, how long and style.  It's totally arbitrary.

In the Band-in-a-box play along, I chose the following:

G7 - Mixolydian (b7)

Ebm9 - Phrygian (b2,3,6,7)

Am7(b5) Locrian (b2,3,5,6,7)  (or think up a half step)

Fm7 - Dorian (b3 and b7)

This is in a swing jazz style.  Three choruses.

If you don't have BIAB . . . then use a metronome.

Enjoy.


Some examples of jazz modal tunes:

  1. Little Sunflower
  2. So What
  3. Impressions
  4. Maiden Voyage
  5. Footprints
  6. Milestones

shadow-ornament


EXAMPLES 


EXAMPLE #1:  Modes from each note in the scale.

Modes-from-each-noteCR


EXAMPLE #2:  Modes from bottom note of the scale.Modes-from-bottom1CR


EXAMPLE #3:  Some Random Chord Structures in F MajorModalChordStructures3

EXAMPLE #4:  Diatonic Turnaround

  Prog1625TurnAdvProg2516Inv

EXAMPLE #5:  "So What Chord"

So-What-Chord

EXAMPLE #6:  Modal Exercise #1 and #2ModalExSBS1

shadow-ornament

DOWNLOADABLE PDFS


Downloads


Learning Giant Steps for the Jazz Pianist

LogoBanner_MartanMannJMC

Learning GS for the JP1200


Learning Giant Steps for the Jazz Pianist Introduction

Giant Steps by John Coltrane has always been considered as a difficult tune for jazz pianists to understand, learn and play. Of course, adding to the complexity is that the tune is usually played very fast. I think, what we really need is a simple, step-by-step approach to studying this tune . . . then developing the tune into our subconscious. Once this tune is totally subconscious, we should be able to freely improvise on it.

This lesson on Learning Giant Steps contains four videos, downloadable PDFs, graphics of examples, and text.  Scroll down this page for more instructional text.  Video #4 contains backup tracks for your practice.  You can practice soloing over Giant Steps in different styles and tempos.  Have fun learning Giant Steps.

I’d also like to mention that I offer Skype lessons.

I’d love to hear your questions and feedback regarding this lesson.  Please contact me at martan@jazzskillsforpiano.com.  If you received this lesson as a “stand-alone” lesson . . . check out my online jazz piano course, JazzSkills for Piano (jazzskillsforpiano.com/wp).

Best to you –

–Martan 🙂

shadow-ornament

Videos

Video 1:  Basic Understanding of Giant Steps:

video
play-sharp-fill

Video 2: Melodic Development:

video
play-sharp-fill

Video 3:  Fast-Tempo Development:

video
play-sharp-fill


Video 4:  Giant Steps Practice Tracks

video
play-sharp-fill

shadow-ornament

Step-by-Step

Step #1:  Basic Understanding of Giant Steps

Let’s take a look at Giant Steps (Example 1).   The tune is 16 bars. All of the principle chord relationships are based on the major third. In the original key, there are only three principle chords: B, G, Eb. Look down the first row and notice the keys: B, G, Eb and B. Also look down from the third measure: Eb, B, G and Eb (See Example 1). This is great for understanding the basic structure Giant Steps, but not helpful in creating a method to play it (See Example #1 below).


 Step #2:  Make a Practice Chart for Giant Steps.

The Practice Chart should contain the melody, bass note, chord changes, comping chords, and scales for each chord. You can also include any helpful analysis.

I suggest that you use a music notation app.  For a free application, go to Finalemusic and download Notepad http://www.finalemusic.com/products/finale-notepad/.

Create a Practice Chart.

  • Bassline
  • Closed position chords and inversions
  • Melody
  • Chord names
  • Scales for every chord
  • Analysis

You can view the Practice Chart below (See Example #2 below).

Step #3:  Practice in chord flows.

For “Flow #1”, say: “B, D, G, Bb, Eb” over and over until the chords are completely in the subconscious.  Then For “Flow #2”, say: “G, Bb, Eb, F#, B” over and over.  Then for “Flow #3”, say: “Eb, G, B, Eb” over and over (When you play this flow, you will play the II V before each chord).  Just to mention:  notice that flows #1 and #2 are descending major thirds  and flow #3 is ascending major thirds.  (The return to the top of the tune on measure 16 is descending.)  (See Example #2:  Chord Flows and Chord Chart)

Step #4:  Practice flows with bass and melody.

Just play through GS with a single note in the bass and a single note in the melody.  This helps to establish the basic melody and form of the tune in your subconscious.

Step #5:  Practice scales for each chord.

Take a look at each of the scales for all the chords in Giant Steps.  Make sure you can play the scales fluently (See Example #2 below).

Step #6:  Practice flows with closed position left hand chords.

Play each of the flows using the closed position chords in the left hand, in all inversions through the tune.  Then, play the closed position chords in all inversions through the entire tune (See Example #2 below).

Step #7:  Continuous Melody Exercise

Practice the Continuous Melody Exercise using quarter notes, quarter-note triplets, eighth notes and eighth-note triplets through the tune.  The left hand plays a single bass note or chord (See Example #3 below).

Continuously Play.

  1. Scales
  2. Triads
  3. Seventh Chords
  4. Pentatonics (1,2,3,5,6)
  5. Then, play melodies which use a combination of scales and chords (arpeggios).  Be musical.  Think forward.

Step #8:  Slowly play each of the flows in the right hand as a complete melodic idea.

Practice making up melodies from one chord to the next chord.  For instance, take the first chord, "B" and play melodic ideas forward to "D7".  Always think and resolve ideas forward.  Do this until you learn the "flow".  Then practice playing slowly over the entire flow.  Do this for all three flows.

Step #9:  Play Giant Steps as a ballad.

Start playing GS slowly through the tune as a ballad.  Take your time.  Allow yourself time to think.  Try to play the ideas emotionally.  Resolve all your melodic ideas (See Example #1 above).

Step #10:  Tune development for faster playing.

Tune development for faster playing.

  • Practice Hanon, scales and arpeggios.
  • Simplify the chord changes
  • Practice in chords
  • Practice with triads
  • Practice with seventh chords
  • Practice with Pentatonics
  • Think of melodic rhythm
  • Breathe in your playing
  • Play musically w/phrasing
  • Play GS in all keys
  • Play GS with others
  • Listen to recordings and transcribe solos

Step #11:  Video #4  Giant Steps Practice

This video contains Band-in-a-box backup practice tracks.  Enjoy practicing your Giant Steps improv.

Video 4: Giant Steps Practice.

  1. Bossa Nova - Starts at 15 seconds
  2. Easy Swing - Starts at 2m 40s
  3. Fast Swing - Starts at 5m 05s
  4. Very Fast Swing - Starts at 6m 50s
shadow-ornament


EXAMPLES


EXAMPLE #1:  Basic Giant Steps Chart
Giant-Steps-Basic


EXAMPLE #2:  Chord Flows and Practice Tune Chart

GiantS-Chord-FlowsAGiantS-Chord-FlowsB


EXAMPLE #3:  Giant Steps Continuous Melody Exercise

GiantSContMelAExGiantSContMelBExGiantSContMelExQNTAGiantSContMelExQNTBGiantSContMelExENAGiantSContMelExENBGiantSContMelExENTAGiantSContMelExENTB

Giant Steps BasicBmel GiantS-Fast-PracticeA GiantS-Fast-PracticeB

shadow-ornament

DOWNLOADABLE PDFS


  • Giant Steps Basic

  • Giant Steps Chord Flows

  • Giant Steps Quarter Note Continuous Melody

  • Giant Steps Quarter-Note Triplet Continuous Melody

  • Giant Steps Eighth Note Continuous Melody

  • Giant Steps Eighth-Note Triplets Note Continuous Melody

  • Giant Steps Fast Practice